Air Fryer Chicken Breast has become a kitchen favorite for its quick preparation and impressive results. With a few simple ingredients and a touch of seasoning, you can create a dish that’s both healthy and incredibly satisfying. Whether you’re meal prepping for the week or looking for a quick, flavorful dinner option, this recipe is sure to become a staple in your cooking repertoire.
Unlike traditional frying, which can be messy and calorie-heavy, the air fryer produces a crispy exterior while keeping the meat inside juicy and tender. Plus, you won’t have to wait long—this recipe is designed to be ready on your table in under 20 minutes. It’s the perfect solution for those busy weeknights when you still want something homemade and full of flavor.
In this guide, we’ll walk you through everything you need to know: from the basic ingredients to expert tips that will make your meal pop. Get ready to discover the delicious potential of your air fryer.
What is Air Fryer Chicken Breast?
Air Fryer Chicken Breast is a modern, healthier approach to a classic dish. It’s simply boneless, skinless chicken breasts cooked in an air fryer, a countertop appliance that uses hot air to cook food faster and with less oil. The result is a dish with a golden, crispy crust and a flavorful, juicy interior. It has become a go-to recipe for home cooks who want something both quick and nutritious.
This recipe originated from the rise in popularity of air fryers in the mid-2010s. As chefs and home cooks alike discovered how the air fryer could enhance flavors while cutting down on cooking time, the air fryer chicken breast emerged as one of the star dishes. Seasoned simply with olive oil, garlic, herbs, and spices, you’re left with a dish that feels both restaurant-quality and easy to make at home.
What sets this dish apart is its simplicity and the way it brings out the natural taste of the chicken without drowning it in sauce or heavy coatings. The chicken stays moist, while the air fryer crisps up the skin in just a few minutes. You don’t need to be a skilled chef to make it—you just need a willingness to try something fresh and new.
Reasons to Try Air Fryer Chicken Breast
This recipe is perfect for cooks of all skill levels, especially those who want to enjoy a lean, protein-packed meal without compromising on taste. Air Fryer Chicken Breast is not only delicious but also incredibly convenient. It takes no more than two short steps—season and cook —and you don’t have to hover over high heat or oil. Once the chicken is in the fryer, you’re free to prep sides or even take a quick walk, knowing your meal is being cooked to perfection.
If you’ve ever struggled with dry chicken or under-seasoned dishes, this recipe can be a game-changer. The combination of olive oil and carefully measured spices creates a balanced flavor profile that’s rich but not overwhelming. Best of all, it pairs effortlessly with a wide variety of side dishes, from roasted vegetables to a simple salad or a hearty grain. You can even transform it into a quick sandwich or wrap for lunch the next day.
Whether you’re a busy parent looking for an easy weeknight dinner, a fitness enthusiast needing a high-protein meal, or a busy professional craving something quick and satisfying, this dish is worth a try. Its ease and consistent quality make it a reliable recipe for anyone who loves food made with care and simplicity.
Ingredients Needed to Make Air Fryer Chicken Breast
- 1 tablespoon olive oil – adds a rich, slightly peppery flavor and helps the spices adhere to the chicken
- 2 chicken breasts (boneless and skinless) – the star of the dish
- 1/2 teaspoon kosher salt (or 1 teaspoon if using Diamond Kosher Salt) – enhances and balances the flavor
- ½ teaspoon oregano – gives the dish an earthy, aromatic note
- ½ teaspoon paprika – adds a touch of color and a warm, smoky flavor
- ½ teaspoon black pepper – adds just the right amount of depth and mild heat
- ½ teaspoon garlic powder – delivers a subtle, roasted garlic flavor without the hassle of chopping
The ingredients are simple and versatile, making this recipe easy to customize and adapt for different tastes or dietary needs. For example, you can swap out the oregano for rosemary if you’re after a more herby, Mediterranean-style dish. Everything is thoughtfully chosen to enhance the chicken without overpowering it. You’ll find the ingredients in any grocery store or online, and they store well, so you can always keep a stash on hand for a quick meal.
Instructions to Make Air Fryer Chicken Breast – Step by Step
Step 1: Begin by gathering all of your ingredients on the counter. This not only makes the process smoother, but it also helps you to visualize the dish coming together. Start by placing your chicken breasts on a clean plate—boneless, skinless, ideally fresh, but thawed if frozen. Take a moment to get the skin side familiar, even though it will be hidden in the cooking—it’s the part that’s more likely to absorb the spices and oil.
Step 2: In a small mixing bowl, combine 1 tablespoon of olive oil, ½ teaspoon of kosher salt (adjust if using Diamond Kosher Salt), ½ teaspoon of oregano, ½ teaspoon of paprika, ½ teaspoon of black pepper, and ½ teaspoon of garlic powder. Stir well until the mixture becomes a smooth paste. The paste should evenly coat and infuse the chicken with all the wonderful flavors. You’re essentially creating a seasoning rub that will lock in the moisture and crisp up the outside just right.
Step 3: Using your hands or a brush, generously coat each chicken breast with the seasoning-paste blend. Don’t skimp—you want every surface of the chicken to meet the blend. Make sure to season the top and bottom, even the edges, as these are the areas most sensitive to dryness. Take a few seconds to enjoy the scent of the herbs mingling with the fresh chicken.
Step 4: Place the coated chicken into the air fryer basket, making sure the pieces are not overlapping so the air can circulate evenly. It’s best to preheat your air fryer to 370°F (if it has a preheat function) but even if you skip it, the temperature will rise quickly. Cooking at a consistent temperature ensures the chicken cooks through evenly without burning.
Step 5: Once the chicken is in the basket, cook for 10 minutes. After that, carefully flip the chicken using tongs and continue cooking for an additional 4 to 8 minutes, depending on the thickness of your chicken breasts. Keep an eye on them and aim for a final internal temperature of 160°F using a meat thermometer. The chicken will continue to cook slightly while resting, and that final burst of heat will guarantee juicy, safe-to-eat meat.
Step 6: Once the chicken is cooked, it’s important to let it rest. Remove the chicken from the air fryer and tent it loosely with aluminum foil. This simple step allows the juices to redistribute and results in a much moister final bite. Let it rest for at least five minutes—trust me, it makes a noticeable difference.
Step 7: After resting, serve the chicken breasts whole or slice them for a more refined look and quicker serving. Either way, serve it warm, ideally paired with your favorite vegetables or a salad to create a balanced and satisfying meal.
Chef’s Tips for a Perfect Result
- Pat the chicken breasts dry before coating: this helps the seasoning stick better and ensures a crispy finish.
- Cook the chicken on the center rack if your air fryer has multiple levels: it allows for even heat distribution.
- Use a meat thermometer: cooking until the internal temperature reaches 160°F guarantees it’s safe to eat and stays juicy.
- Don’t flip too early: let the chicken cook for the full 10 minutes before flipping to get a golden crust on each side.
Variations and Substitutions
Herb Swap: Oregano can be replaced with rosemary or thyme for a more aromatic and floral flavor.
Spicy Option: Add a pinch of cayenne pepper to the seasoning mix for a kick of heat while keeping the chicken moist.
Gluten-Free Alternative: This version is naturally gluten-free, but if you’re using a store-bought spice mix, always double-check the label for gluten content.
Vegan Version: Replace the chicken with firm tofu or grilled portobello mushrooms for a satisfying, plant-based meal.
Low-Carb Version: This recipe is already low in carbohydrates, and you can serve it with roasted zucchini or cauliflower rice to maintain a low-carb diet.
Budget-Friendly Option: Use chicken thighs instead of breasts—they’re often more affordable and just as flavorful when cooked in the air fryer.
How to Serve and Pair
Air Fryer Chicken Breast is incredibly versatile in the way it can be served. You can slice it and serve it over a bed of quinoa or brown rice, or serve it as-is for a rustic, hearty feel. A light, refreshing salad with cherry tomatoes and cucumbers complements the dish wonderfully, cutting through the richness of the spices.
When it comes to side dishes, roasted sweet potatoes or a creamy mashed cauliflower make excellent companions. For a low-carb option, try air-fried zucchini slices with a bit of olive oil and herbs. If you’re serving this as part of a meal prep routine, wrap it up in a lettuce leaf for a portable, no-carb bite or place it in a whole-grain pita with grilled veggies for a satisfying lunch.
For a truly special occasion, try adding a drizzle of lemon zest-infused olive oil or a dollop of plain yogurt mixed with chopped herbs and garlic. This adds a new layer of flavor and texture while keeping the meal light and balanced.
Storage and Reheating
Refrigerator: Store cooked chicken in an airtight container for up to 3 days. Wrap slices tightly to avoid moisture loss.
Freezer: Freeze whole, uncooked chicken breasts in a sealed freezer bag for up to 2 months. To freeze cooked chicken, wrap it in plastic wrap and place it in a freezer-safe bag.
Room Temperature: Cooked chicken is best eaten within 2 hours of being cooked to avoid spoilage. Don’t let it sit out for long if you’re not ready to eat it right away.
Reheating: For best results, reheat in a preheated oven at 350°F for 8–10 minutes or in an air fryer at 370°F for 3–4 minutes. Avoid the microwave if you want to maintain a crispy crust and rich flavor. If the chicken has dried out slightly upon reheating, you can spritz it with a bit of water before placing it back in the oven or air fryer.
Nutritional Values
- Calories: 326 kcal
- Protein: 48 g
- Carbohydrates: 1 g
- Fat: 13 g
- Fiber: 1 g
Approximate values.
Frequently Asked Questions
Can I use a different oil instead of olive oil for the seasoning paste?
Yes, coconut oil or avocado oil can be used as a substitute—they have similar smoke points and mild flavors. Just be sure the oil you choose won’t overpower the chicken’s natural taste.
How do I know when the chicken is fully cooked in the air fryer?
Use a meat thermometer to check the internal temperature. The chicken is safe to eat when it reaches 160°F. Even if it looks slightly underdone, the heat from the oven will continue to cook it during resting.
My chicken came out a little dry—what did I do wrong?
Overcooking is the most common issue. Make sure you’re cooking at the correct temperature (370°F) and using a thermometer to avoid overcooking. Letting the chicken rest after cooking also helps retain moisture.</n
Can I prep this in advance and cook it later?
Absolutely! You can season the chicken and refrigerate it for up to 24 hours before air frying. If you’re using frozen chicken, thaw it first and pat it dry before seasoning to preserve the texture.
What sides work best with this dish?
Roasted vegetables, a grain such as quinoa or brown rice, and a light salad or yogurt-based dip all pair nicely. For a low-carb meal, try roasted zucchini or a fresh avocado salad.
Conclusion
Air Fryer Chicken Breast is the perfect combination of ease, flavor, and nutrition. With its crispy finish and juicy interior, it’s a dish that’s hard to resist. Whether you’re cooking for yourself or feeding a family, this recipe ensures a delicious and satisfying meal every time. The secret to its appeal lies in the thoughtful balance of spices and the tender bite of perfectly cooked chicken—a flavor-packed bite that will bring back memories of home-cooked meals and fresh flavors.
So why not bring this to your kitchen today? You might just find a new favorite.
Print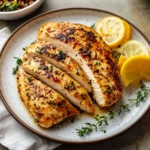
Air Fryer Chicken Breast
- Prep Time: 5
- Cook Time: 14
- Total Time: 19
- Yield: 4 servings 1x
- Category: dinner
- Method: Air Frying
- Cuisine: American
- Diet: None
Description
Tender, juicy, and flavorful chicken breast cooked in the air fryer for a quick and healthy weeknight meal. Ready in under 20 minutes without the need for heavy oil or complicated steps.
Ingredients
4 boneless, skinless chicken breasts
2 tablespoons olive oil
1 teaspoon garlic powder
1 teaspoon paprika
1 teaspoon dried herbs (like oregano or thyme)
1 teaspoon salt
1/2 teaspoon black pepper
Instructions
Preheat air fryer to 375°F (190°C)
Pat chicken breasts dry with paper towels for even cooking
In a small bowl, mix olive oil with garlic powder, paprika, herbs, salt, and black pepper
Evenly brush the seasoning mixture over both sides of the chicken breasts
Place chicken in the air fryer basket, leaving space for air to circulate
Cook for 10-14 minutes, flipping halfway through, until golden brown and internal temperature reaches 165°F (74°C)
Notes
For extra flavor, marinate the chicken in the seasoning mix for 10-15 minutes before cooking. Let the chicken rest for 3-5 minutes before serving to retain moisture.
Use a meat thermometer to ensure the breasts are fully cooked and not overdone.
Store leftovers in an airtight container in the refrigerator for up to 3 days or freeze for up to 3 months.
Nutrition
- Serving Size: 1 chicken breast
- Calories: 190
- Sugar: 1g
- Sodium: 650mg
- Fat: 7g
- Saturated Fat: 1g
- Carbohydrates: 1g
- Fiber: 0g
- Protein: 26g
- Cholesterol: 80mg