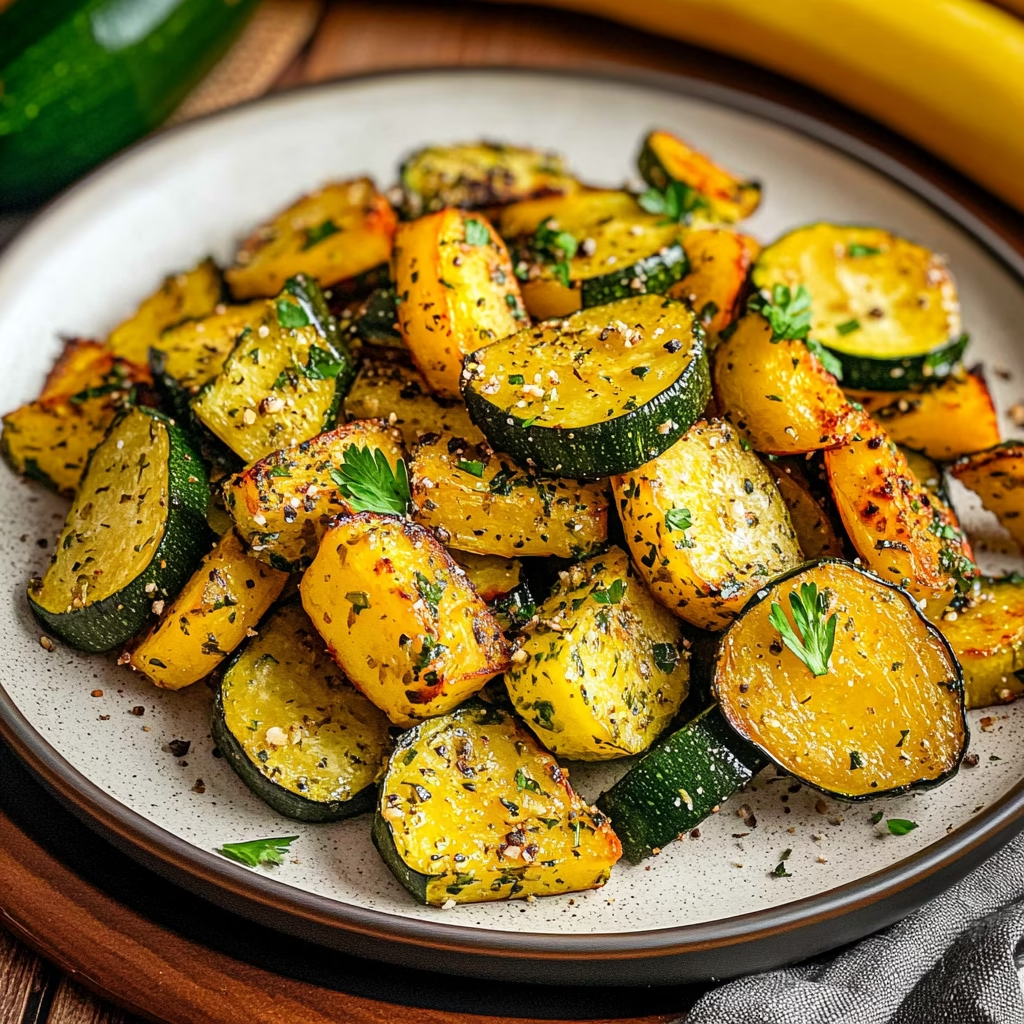
Air Fryer Zucchini and Squash is the golden-hued shortcut to summer kitchen joy. This dish transforms two garden-favorite vegetables into a caramelized, herb-kissed side that shimmers with simplicity. Just 5 minutes of prep and 12 minutes in the air fryer yield tender rounds with a satisfying crunch, perfect for pairing with grilled proteins or standing alone as a healthful snack. When I first learned this method from my aunt’s sun-soaked Mediterranean cookbook, I wondered how something so minimal could taste so vibrant—but now it graces my table every warm-weather weeknight.
With no need for starchy coatings or oil-heavy frying, this version lets the squash’s natural sweetness shine. The hot air fryer circulates just enough heat to create those coveted roasted edges while preserving moisture for fork-tender centers. Whether you’re after a quick side for a pasta dinner or a flavorful base for grain salads, this recipe delivers the perfect balance of char and brightness. Let’s explore how these humble vegetables become star-worthy with nothing more than olive oil, garlic, and herbs.
What is Air Fryer Zucchini and Squash?
This dish is a modern take on seasonal simplicity, using the air fryer’s rapid heat to transform summer squash into a crispy-tender marvel. While the Mediterranean coastline has long celebrated zucchini and summer squash in oven roasts and sizzled salads, the air fryer brings that charred-edge magic to home cooks with minimal effort. The key lies in slicing the vegetables evenly—about half-moon shapes—so the oil and seasonings cling uniformly. Olive oil acts as both lubricant and flavor base, carrying garlic, oregano, and basil into every crevice while letting the squash’s natural sugars glaze into golden perfection.
The beauty of this recipe is in its authenticity. My aunt’s traditional method relied on open-fire grills to achieve those same smoky notes, but the air fryer replicates the crispiness with no smoke and less oil. By the end of the cooking time, you’ll see each slice transform from pale green to a warm amber-brown, with a texture that’s firm on the crust but soft within. It’s a technique that respects Mediterranean culinary roots while embracing contemporary convenience in the American kitchen.
Reasons to Try Air Fryer Zucchini and Squash
Busy evenings require meals that don’t compromise on flavor, and this recipe checks that box. With under 10 minutes of hands-on work, you can have a side dish that tastes effortful without demanding hours in the kitchen. The air fryer’s efficiency means no more babysitting the stove or dealing with oil splatters—just set it, shake it halfway through, and let the technology do the heavy lifting. For families, it’s a way to sneak extra vegetables into meals; for solo cooks, it’s a satisfying solo snack that doubles as a colorful garnish for grain bowls or sandwiches.
Health-conscious cooks will appreciate this version’s clean ingredients: no breadcrumbs, no cheese, just herbs and oil. The air fryer’s low-oil method keeps calorie counts low while maximizing that roasted, slightly sweet flavor. And because zucchini and squash are in season during late spring and summer, this becomes a cost-effective way to enjoy peak harvest flavors. Beginners should embrace this recipe too—the ingredients list is short, and the steps can’t be simpler. Even if your air fryer is newer than your last kitchen gadget, the process remains straightforward and forgiving.
Ingredients Needed to Make Air Fryer Zucchini and Squash
1 medium zucchini (about 6–8 inches long, trimmed to remove tough ends)
1 medium yellow squash (same size and trimming instructions for even cooking)
1 tablespoon olive oil (preferably extra virginia for a delicate fruity finish)
1 teaspoon granulated garlic (for an oil-based garlic infusion without raw bite)
1 teaspoon dried oregano (Mediterranean blend for that sun-kissed aroma)
1 teaspoon dried basil (to add a mild peppery freshness)
½ teaspoon salt (adjust to taste—this balances the vegetables’ sweetness)
Fresh cracked pepper (to order, for that earthy finish)
Instructions to Make Air Fryer Zucchini and Squash – Step by Step
Step 1: Start by preheating your air fryer to 475°F (240°C). While it warms up, wash the zucchini and squash thoroughly in cold water. Trim off the ends with a sharp paring knife—this removes the woody bits that can overcook and bitter the final dish. Slice them into half-moon shapes, aiming for a consistent thickness of ½ to ¾ inch (1.3 to 1.9 cm). Uneven slices mean some will burn before others soften, so take care to keep them uniform. If your vegetables are particularly thick, you can cut them lengthwise into quarters for even browning.
Step 2: In a large mixing bowl, combine the vegetable slices with olive oil. Use a spatula to toss gently, ensuring every piece gets a thin coat of oil—this is how you’ll achieve that perfect sear. Now add the granulated garlic, oregano, and basil. Salt and pepper each piece with your fingers; it’s easier to control than sprinkling. My aunt always said ‘feel the seasoning’—she swore you could sense when each cut had just the right amount of herb dusting. Once coated, let the mixture sit while the air fryer preheats; this time lets the flavors begin to cling.
Step 3: Arrange the seasoned vegetables in a single layer in your fryer basket. Make sure they aren’t nestled too closely—this air-circulation trick prevents sogginess and ensures each piece browns evenly. If your air fryer basket is smaller, cook in two batches to avoid stacking. During these 12 minutes, you could rinse your mixing bowl or chop veggies for a salad. Halfway through, pause the air fryer and gently lift the basket. Shake it back and forth to redistribute the slices, and flip any that seem to brown too quickly. This step saves you from kitchen fails where one side burns and the rest remains pale.
Step 4: Watch closely during the final 2–3 minutes. When they’re caramelized in spots and visibly softened from the edges inward, you’ll smell the herbs mingling with a toasted-vegetable aroma. Remove the slices immediately they reach this ‘just golden’ stage—the last thing to do is wait. Serve them warm, ideally within 5 minutes of cooking, to preserve that crispiness. If you’re pairing with a main dish, use a slotted spoon while transferring—avoid smushing those delicate charred edges.
Chef’s Tips for a Perfect Result
- Don’t skip the preheat: Those 3–5 minutes of preheating drastically reduce total cooking time by ensuring the fryer basket reaches optimal heat immediately, preserving the vegetables’ moisture while charring the exterior.
- Use parchment paper: Line your air fryer basket with a small parchment sheet to catch excess oil and moisture. This keeps the fryer basket from sticking and makes cleaning effortless later.
- Season aggressively: Summer squash can feel under-seasoned after roasting, so don’t fear adding a bit more spice if your recipe allows it. I often sprinkle additional dried chili flakes in my variations for gentle heat.
- Keep your knife sharp: Dull tools turn slicing into frustration. A sharp paring knife ensures clean half-moon shapes and avoids bruising the vegetables, which affects their structure while cooking.
- Test your thickness: Too thin and slices will dry out; too thick and they won’t cook through. A digital kitchen scale helps measure the vegetable weight to ensure even size distribution across your basket.
- Rest before serving: Let the slices cool for 1–2 minutes after removal to avoid steam re-moistening the crispy edges. A wire rack beneath the serving platter helps maintain structure longer.
Variations and Substitutions
Herb Swap: Replace oregano and basil with smoked paprika or za’atar to change the flavor profile. These give the dish a Middle Eastern flair while keeping it pork-free and alcohol-free.
Gluten-Free Alternative: While this base remains gluten-free, adding a gluten-free breadcrumb coating (coconut flour or almond flour mixture) creates that ‘breaded’ texture without binders. Just dredge slices lightly before oiling.
Low-Carb Version: Substitute regular olive oil with high-heat avocado oil for a richer, grassy finish. Add a squeeze of lemon juice post-cooking to replace dairy-based cheeses and maintain a light tang.
Budget Upgrade: Use fresh herbs like thyme or rosemary instead of dried; they add more depth for a slightly higher cost. Just bruise the leaves gently after chopping to release more essential oils into the mix.
Global Twist: Add a pinch of cumin and turmeric during tossing for a warm, earthy tone—ideal for pairing with chickpeas to make it a one-bowl side dish with a North African influence.
How to Serve and Pair
These roasted slices shine alongside grilled salmon or lemon-butter chicken. For vegetarian meals, pair them with a warm grain salad like farro or quinoa. When I’m hosting summer picnics, I toss half with chopped fresh parsley, a drizzle of balsamic glaze, and serve them warm in parchment paper bowls. A quick upgrade adds crumbled feta (skip brined varieties with liquid) or a sprinkle of dukkah nut topping for texture contrast.
- Pairing 1: Lemon herb couscous and a chickpea tabbouleh for a full grain bowl meal
- Pairing 2: Crisp arugula salad with cherry tomatoes and pine nuts for a peppery bite
- Pairing 3: Grilled shrimp skewers brushed with harissa and lemon juice for a Mediterranean platter
- Occasion Idea: These work perfectly on a late-summer patio picnic with iced Greek yogurt dips and crusty bread
- Plating Tip: Stack them in a small baking dish and serve family-style for casual gatherings
Storage and Reheating
Refrigerator: Store leftovers in an airtight container for up to 3 days. Stack them with parchment paper separators to avoid moisture pooling. They’ll retain flavor but lose crispiness after 24 hours.
Freezer: Freeze in a freezer-safe bag after cooling completely. They’ll keep for 2–3 months. Best reheated from frozen, as thawing releases too much liquid—no need to defrost first.
Room Temperature: Keep 4-hour maximum in a clean metal or ceramic bowl. They soften gradually but stay edible slightly longer than plastic containers would allow.
Reheating:
The oven (not toaster oven) at 375°F (190°C) restores firmness better than microwave. Place on a baking sheet lined with parchment; heat for 10–12 minutes. Alternatively, use the stovetop in a nonstick skillet over medium heat for 5–7 minutes, tossing to crisp edges. Add ½ teaspoon oil to the pan first if they feel too dry. Avoid high heat, as pre-cooked slices burn quickly.
Nutritional Values
- Calories: 60 per serving
- Protein: 1g
- Carbohydrates: 8g
- Fat: 4g
- Fiber: 2g
Approximate values.
Frequently Asked Questions
Can I substitute butternut squash for summer squash?
Yes, but adjust slicing and cooking time. Summer squash requires thinner slices and high heat for quick caramelization, while butternut needs thicker cuts and longer roasting. This recipe is best reserved for tender varieties like zucchini and yellow squash.
How do I know the squash and zucchini are cooked perfectly?
Look for amber-brown edges and tender centers—you should be able to pierce a piece easily with a fork. The slices should feel crisp on the outside but give slightly when pressed. If they’re still firm after 12 minutes, try extending the timer by 2 minutes in 1-minute intervals.
My squash released too much water during cooking. Why did that happen?
Overcrowding the basket stops hot air from evaporating moisture. Always cook in single layers. If using particularly juicy zucchinis, pat them dry after slicing—this trick reduces sogginess even with correct spacing (learned this after burning several batches at my first family gathering!)
Can I prep this in advance?
Absolutely. After slicing and seasoning, store on a parchment-lined tray in the fridge for up to 24 hours. Cook as directed, adding 2 extra minutes to the timing. For longer storage, freeze raw slices in a single layer before seasoning, then defrost and follow the recipe as written.
How can I add more umami to the dish?
Brush olive oil over the slices and sprinkle with nutritional yeast right after cooking cools. This adds a cheesy depth, or use roasted pine nuts tossed during the final minute of air frying for nutty richness. Either upgrade takes it from simple to memorable with minimal effort.
Conclusion
Air Fryer Zucchini and Squash prove that sometimes the best meals start with the humblest ingredients. It’s a recipe that honors the sunlit gardens of Mediterranean cuisine and the time-conscious needs of modern life. Once you taste those caramelized edges and herb-kissed centers, you’ll rethink how you treat the summer vegetable bounty—because perfection comes in golden brown rounds.
Print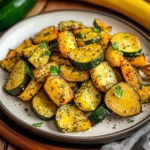
Air Fryer Zucchini and Squash for a Crispy Summer Side Dish
- Prep Time: 5
- Cook Time: 12
- Total Time: 17
- Yield: 4 side dish servings 1x
- Category: dinner
- Method: Air Frying
- Cuisine: Mediterranean
- Diet: Vegetarian
Description
A golden, herb-kissed summer side dish made in minutes. Crispy edges and tender centers shine without oil or flour—just olive oil, garlic, and fresh herbs combine for Mediterranean-inspired simplicity.
Ingredients
2 medium zucchinis (sliced into 1/4-inch half-moons)
2 small yellow squash (sliced the same way)
1 tablespoon olive oil
1 clove garlic (minced)
1 teaspoon dried oregano
1 teaspoon dried basil
1/2 teaspoon sea salt
1/4 teaspoon black pepper
Instructions
Toss zucchini and squash in a bowl
Add oil and seasonings, mixing well
Transfer to air fryer basket in single layer
Cook at 400°F for 10 minutes
Shake basket and cook 2 more minutes
Sprinkle with fresh parsley or thyme before serving
Notes
Adjust slicing thickness for crispiness
Use a non-metal air fryer rack for even browning
Serve warm with olive oil drizzle if desired
Store in airtight container for 2 days
Nutrition
- Serving Size: 1/2 cup
- Calories: 75
- Sugar: 2g
- Sodium: 180mg
- Fat: 5g
- Saturated Fat: 0.8g
- Carbohydrates: 8g
- Fiber: 2g
- Protein: 2g
- Cholesterol: 0mg