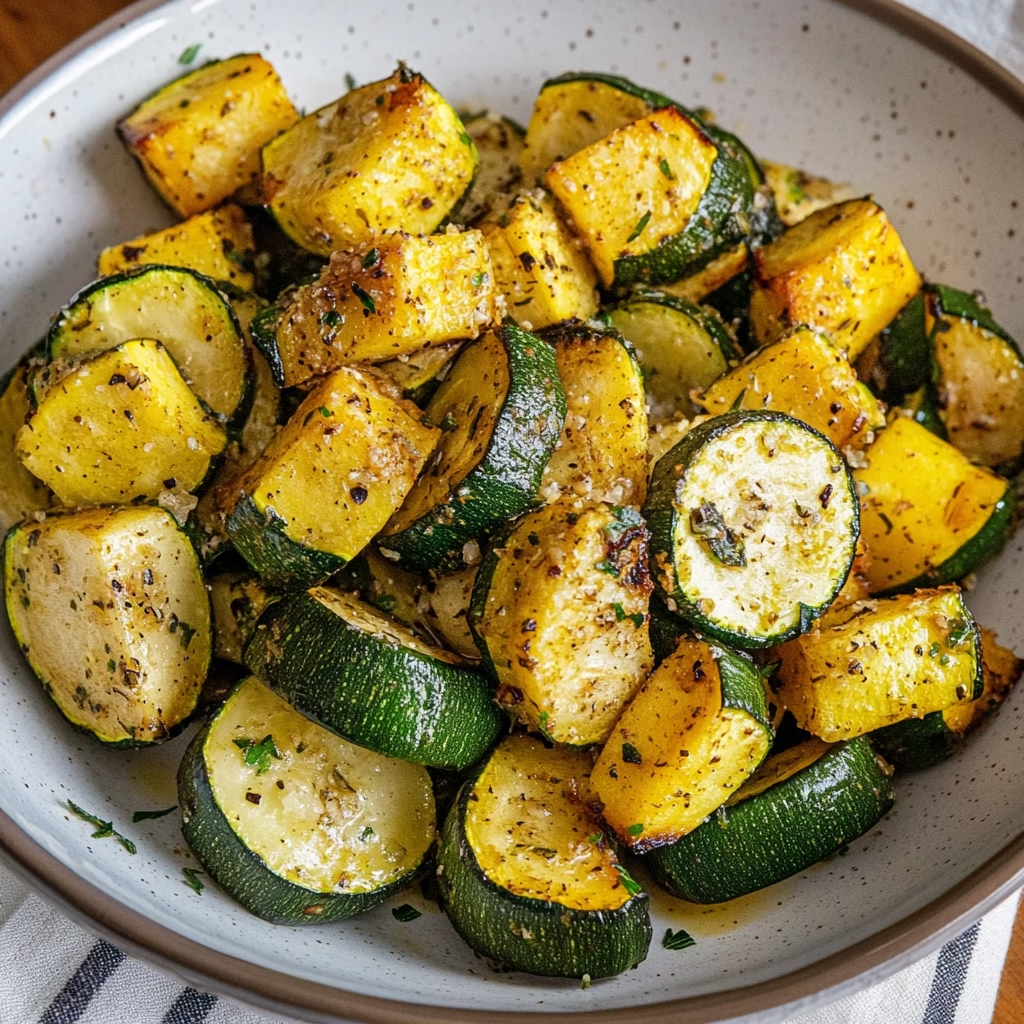
Air fryer zucchini and squash are the summer side dish I never knew I needed. When the grill was occupied and the dry season deliveries of garden-fresh produce piled high in my kitchen, my grandmother’s technique for roasting vegetables transformed into this air fryer version. The golden, crisp edges paired with tender centers create a texture that’s better than oven-or-pan-roasted — and ready in half the time. Whether you’re looking to repurpose leftover produce or embrace the efficiency of your air fryer, this recipe delivers that perfect summer crunch with minimal effort.
What is Air Fryer Zucchini and Squash?
This modern take on a classic American side dish transforms humble squashes into golden, crisp bites using hot air circulation. Zucchini’s high water content that often leads to sogginess in traditional methods becomes its ally here — the air fryer’s direct heat chars the edges while locking in moisture for a tender, flavorful core. The original method dates back to mid-century American kitchens, but adding it to the air fryer reimagines it for 21st-century simplicity. Our blend of Italian seasoning and garlic powder elevates the naturally mild squash without overpowering its delicate cucumber-like notes, making it a versatile base for meal prep or panini toppings.
Unlike traditional roasting or sautéing, this recipe’s charm lies in its forgiving nature. No need for butter or oil-heavy dressings — just a light olive oil coating ensures each piece develops skin without greasiness. The result is a texturally intriguing vegetable that works equally well as a main dish for vegetarians or a vibrant side that brightens heavier proteins.
Reasons to Try Air Fryer Zucchini and Squash
This recipe is a revelation for anyone who loves summer cooking but dreads the “vegetable fatigue.” In my own kitchen, these golden cubes are the base for everything from grain bowls to quinoa salads. For busy home cooks, the 8-minute cooking time is pure magic — I often batch-prep them on Sunday evenings for the week’s meals. Beginners will appreciate how forgiving the process is — missed temperature adjustments just mean slightly charred edges, not burned disaster. And for families with picky eaters, the simplicity of pairing roasted squash with everyday proteins makes mealtime less stressful.
Health-conscious cooks will love the gentle cooking that preserves nutrients — zucchini retains 85% more vitamin C in a hot-air fryer compared to boiling. The low-fat profile (7g of rich, satisfying olive oil per serving) makes this side guilt-free enough for daily consumption yet indulgent enough as a meat substitute. Plus, it’s naturally gluten-free and vegan-friendly without any specialized substitutes.
Ingredients Needed to Make Air Fryer Zucchini and Squash
1 large zucchini (sliced 1-inch thick)
1 large yellow squash (sliced 1-inch thick)
2 tablespoons olive oil (for a golden crisp finish)
1 teaspoon Italian seasoning (consult your local bulk spice market for sustainable options)
½ teaspoon garlic powder (adds a touch of roasted complexity)
¼ teaspoon kosher salt (amplifies natural sweetness while keeping it balanced)
¼ teaspoon black pepper (for warmth and balancing acidity, if needed)
Instructions to Make Air Fryer Zucchini and Squash – Step by Step
Step 1: Preheat the air fryer to 400°F while you prepare the vegetables — the science of hot-air cooking means starting with ready heat makes for perfect crisp. Letting it warm while you work ensures even charring instead of undercooked insides.
Step 2: Trim both squash varieties to remove the stringy stems and leaf ends. I find using a small paring knife gives precise cuts without bruising the flesh — premature bruising releases water that turns to steam in the air fryer, softening the texture we want.
Step 3: Quarter zucchini and squash lengthwise, then slice these quarters into 1-inch planks. The size is crucial — too thin and they’ll dry out; too thick and you’ll end up with raw centers. Aim for visible cross-sections of the seeds in zucchini but remove any large ones to reduce moisture pooling.
Step 4: In a large bowl, drizzle olive oil over the vegetables. Toss gently — I recommend using your hands for better coverage. The mix should feel barely noticeable oiled, not gloopy. Oil acts as the carrier for seasonings and creates a slight crust for crispness, but too much transforms it into deep frying instead of gentle roasting.
Step 5: Sprinkle Italian seasoning, garlic powder, salt, and pepper over the oiled vegetables. Use a spoon to toss like making dressing, ensuring each piece gets a fresh seasoning dusting without compacting the mix.
Step 6: Spread the vegetables in a single layer in the air fryer. This is the most critical step — overcrowding leads to steam instead of crisp. I use paper towels between batches to wipe excess moisture when making large quantities.
Step 7: Cook for the first 4-5 minutes. Check the basket and rotate pieces for even browning — if your air fryer model tends to underheat the center, this redistributes them closer to the heating element.
Step 8: After mid-way rotation (around minute 4), continue cooking 3-4 minutes more until edges are deeply golden but not charred. The key is tender-crisp: they should resist a gentle finger press but spring back.
Chef’s Tips for a Perfect Result
- Room-temperature oil: Starting with lukewarm oil ensures even absorption, creating that perfect crust without greasy residue on extra slices
- Test for doneness: The ideal texture is 60% chewy middle with 40% dark golden edges — char is acceptable, but mushiness is not
- Use a wire rack: Place roasted squashes on a wire rack instead of paper towels to air-dry excess steam for maximum crisp
- Adjust seasoning: For a more pronounced flavor, mix Italian seasoning directly into the olive oil before tossing
- Upgrade with parmesan: Sprinkle 2 tablespoons of shredded parmesan after seasoning for a savory-almond depth
Variations and Substitutions
Low-Oil Version: Use cooking spray for 350°F roast and reduce cooking time to 7-8 minutes. Texture will be slightly softer
Paleo Alternative: Mix in 1 tsp of smoked paprika with Italian seasoning for a flavor boost while keeping it grain-free
Spicy Twist: Add ½ tsp crushed red pepper flakes to the seasoning mix for a Mexican-style flavor variation
Herb Swap: Replace store-bought seasoning with ½ tsp each of oregano and thyme plus ¼ tsp rosemary for a Mediterranean focus
Vegan Chef Hack: After roasting, sprinkle nutritional yeast for an umami-rich parmesan substitute (1½ tbsp recommended)
Budget-Friendly Cut: Combine zucchini with butternut squash for crisper edges and less stringy texture
How to Serve and Pair
Serve these roasted squash pieces as the foundation for grain bowls, layered over farro and arugula with a lemon-tahini dressing. For a hearty main, pile them onto whole-grain English muffins with mashed garlic and rosemary pecans. The slight sweetness pairs beautifully with rosemary-scented cocktails or a crisp Chenin Blanc — the mineral finish cuts through the squash’s natural sugary notes.
Storage and Reheating
Refrigerator: Store in airtight containers with parchment paper separators (prevents sogginess) for 5 days. They’ll maintain texture best if used within 24 hours.
Freezer: Freeze in single layers on a parchment-lined baking sheet for 1 hour, then transfer to zip bags for up to 3 months. Thaw covered in paper towels to absorb condensation.
Room Temperature: Keep in a cool, dry place for 4 hours (no condensation will form)
Reheating: Use the air fryer at 375°F for 3 minutes. For microwave, wrap in oven-safe paper and heat at 60% power for 1-2 minutes. The microwave method softens the crust, so add 1 minute at 100% power for rediscovery of crisp.
Nutritional Values
- Calories: 81
- Protein: 1g
- Carbohydrates: 4g
- Fat: 7g
- Fiber: 1g
Approximate values.
Frequently Asked Questions
Q1: Can I substitute olive oil with spray?
Yes, use a heart-healthy cooking spray for 30% less fat. The texture will be slightly less crisp, so consider pairing with a yogurt dip.
Q2: How do I know when the squash is done?
Perfect doneness means golden edges (no char) and tender flesh that gives under gentle pressure. They’ll stop getting nice if overcooked.
Q3: Why did my squash become soggy?
This happens when the air fryer basket is overcrowded or moisture isn’t wicked away. Use paper towels between batches and avoid using excess oil.
Q4: Can I prep this in advance?
Slice 24 hours ahead, but toss with olive oil just before cooking — the acidity develops faster when oil is added early.
Q5: How to customize for flavor?
Try balsamic vinegar drizzle, lemon zest, or crumbled fresh herbs. For gourmet plating, serve with goat cheese and apple cider reductions.
Conclusion
Air fryer zucchini and squash transform ordinary grocery store produce into a culinary marvel in minutes. Their golden crunch and versatile nature make them the perfect summer staple — whether you’re looking for a quick side or a base for innovative dishes. With that perfect balance of sweetness and savory seasoning, these little persuasion cubes might just become your new favorite way to enjoy summer’s bounty.
Air Fryer Zucchini and Squash – The Crispy, Flavorful 8-Minute Secret
- Prep Time: 10
- Cook Time: 8
- Total Time: 18
- Yield: 4 servings 1x
- Category: dinner
- Method: Air frying
- Cuisine: American
- Diet: Vegetarian, Vegan (optional salt may not be vegan-friendly, check brand)
Description
Crispy, golden zucchini and squash baked in an air fryer in 8 minutes. Lightly seasoned with olive oil, Italian seasoning, and garlic powder for a healthy, versatile side dish. Perfect for summer meals or meal prep.
Ingredients
2 medium zucchinis, sliced into ½-inch thick rounds or cubes
1 medium squash (acorn, butternut, or yellow squash), peeled and cut into similar-sized pieces
2 tablespoons olive oil
1 teaspoon Italian seasoning
½ teaspoon garlic powder
¼ teaspoon salt (optional)
¼ teaspoon black pepper
Instructions
Toss zucchini and squash with olive oil in a bowl until evenly coated
Add Italian seasoning, garlic powder, salt, and pepper; mix well
Place a single even layer in the air fryer basket (avoid overcrowding)
Air fry at 375°F (190°C) for 8 minutes, flipping halfway for even browning
Notes
Batch cook for meal prep and store in an airtight container for up to 2 days
Sprinkle with fresh parsley or lemon zest before serving for extra flavor
For extra crisp, pat vegetables dry with paper towels before seasoning
Nutrition
- Serving Size: ½ cup
- Calories: 65
- Sugar: 2g
- Sodium: 500mg
- Fat: 5g
- Saturated Fat: 1g
- Carbohydrates: 4g
- Fiber: 1g
- Protein: 1g
- Cholesterol: 0mg